When you click on links to various merchants on this site and make a purchase, this can result in this site earning a commission. Affiliate programs and affiliations include, but are not limited to, the eBay Partner Network.
🎃 12ft Skeleton Shoulder Upgrade Kit 🎃
Professional-Grade White ASA Replacement Parts
Weather-Resistant White ASA
OEM Color Match • Multi-Season Durability • UV-Stable
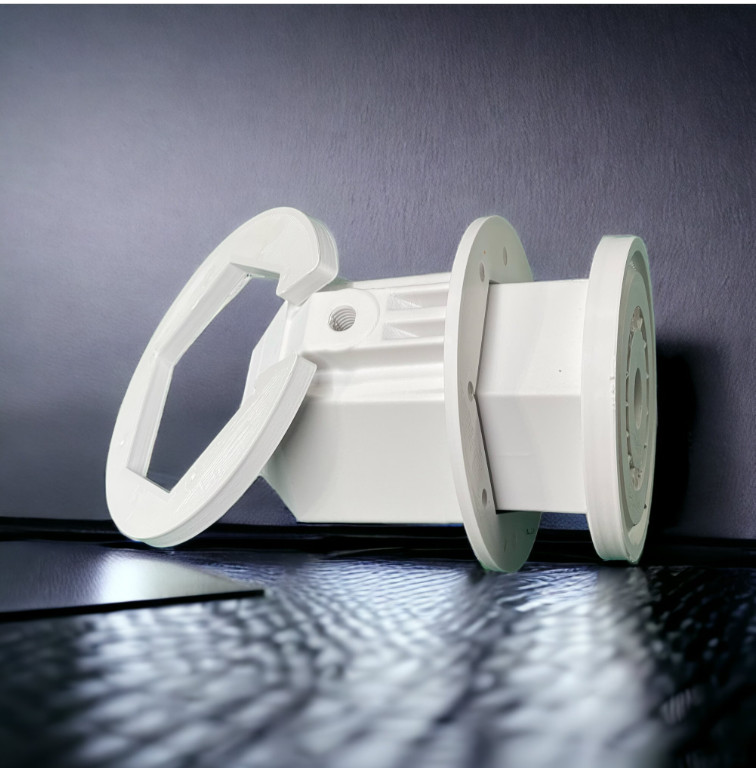
Transform your Home Depot 12ft Skelly with industrial-grade materials and precision engineering. This complete shoulder upgrade kit includes everything needed to restore or strengthen one shoulder joint.
Complete Kit Includes
- Male connector with threaded metal inserts - White ASA
- Female connector piece with alignment arrows - White ASA
- Structural reinforcement bracket - White ASA
- Premium stainless steel screws + M8 bolt
- Installation guide with detailed tips
Perfect for seasonal displays with classic skeleton aesthetic!
Why This Kit Outperforms Stock Parts 🔩 Threaded Metal Inserts
Industrial-grade brass inserts at critical stress points. This is the upgrade that prevents failure.
🌦️ Weather-Resistant ASA
Same material used in automotive trim. Won't crack, fade, or become brittle from UV exposure like stock parts.
💪 Reinforcement Bracket
Adds structural support the original design lacks, distributing stress across a larger area.
⚙️ Quality Hardware Included
Stainless steel fasteners that won't rust or corrode. Professional-grade components throughout.
Visual Installation Guide 📐 THE "SANDWICH" CONNECTION METHOD STEP 1: Position Female Connector (Outside) OUTSIDE VIEW │ SKELETON │ │ BODY │ ← Skeleton plastic shell │ │ │ ┌───────┐ │ │ │ ↓ ↓ │ │ ← Female connector with arrows │ │FEMALE │ │ │ └───────┘ │ ↓ ↓ Drill pilot holes where arrows point STEP 2: Install Reinforcement (Inside) INSIDE VIEW (looking through skeleton body) │ │ │ ╔═══════════╗ │ ← Reinforcement bracket │ ║REINFORCE- ║ │ (goes INSIDE body) │ ║MENT ║ │ │ ╚═══════════╝ │ │ ↑ ↑ │ │ │ Use pilot holes to secure from behind STEP 3: The Complete "Sandwich" CROSS-SECTION VIEW OUTSIDE INSIDE ┌────────┐ │ FEMALE │ ←─── Female connector (outside) └────┬───┘ │ ═════╪═════ ←─── Skeleton body wall │ ╔════╧════╗ ║REINFORCE║ ←─── Reinforcement (inside) ╚═════════╝ Screws go: Female → Through body → Into reinforcement Creates rock-solid connection! STEP 4: Add Male Connector (Arm Side) ┌──────────┐ │ ARM │◄────────┤MALE CONNECTS│ │ │ ┌──────┤ TO FEMALE │ │ ┌────┐ │ │ │ │MALE│◄─┘ │ │ └────┘ │ ┌───────────┐ │ FEMALE │ │ (BODY) │ └───────────┘
Tools Needed: Phillips screwdriver + drill with small bit for pilot holes
Part 1: Female Connector & Reinforcement (Body Side)
- Position the femalewhere the original shoulder was located
- Mark and drill 2 pilot holes where the alignment arrows are pointing on the female piece
- Remove the female connector temporarily
- Insert the reinforcement bracket from the inside of the plastic skeleton body area (it goes behind the shell)
- Use the 2 pilot holes to secure the reinforcement bracket in place with screws (this anchors it from behind)
- Reposition the female connector on the outside of the skeleton body
- Screw through the female connector into the reinforcement bracket - the threaded inserts will grab securely, creating a "sandwich" connection
Part 2: Male Connector (Arm Side)
- Remove the original male connector from the skeleton arm
- Install the new male connector from the kit in its place
- Align and connect the male connector to the female connector
- Final tighten all fasteners - hand-tight plus a quarter turn (DO NOT OVERTIGHTEN)
💡 Pro Installation Tips
- Pilot holes are KEY: The arrows on the female piece show exactly where to drill - these holes anchor the reinforcement from behind
- Reinforcement goes INSIDE: The bracket sits behind the skeleton's plastic shell for maximum support
- The "sandwich" effect: Skeleton body → Reinforcement (inside) → Female connector (outside) = rock-solid installation
- Arm-side alignment: Take your time with the male connector - 4-5 screws engaged is plenty for full strength
- Don't overtighten: The threaded inserts do the work - hand-tight is sufficient
- Test fit first: Loosely position everything before final tightening to ensure proper alignment
⚠️ Common Mistakes to Avoid
- ❌ OVERTIGHTENING SCREWS: This is the #1 mistake! The threaded metal inserts are designed to grip firmly with moderate torque. Overtightening will strip the plastic around the insert or crack the parts. Stop when you feel resistance - hand-tight plus a small quarter turn is perfect.
- ❌ Skipping the pilot holes: Don't try to guess where to drill. The arrows on the female connector show the exact placement. These pilot holes are critical for proper reinforcement alignment.
- ❌ Installing reinforcement on the OUTSIDE: The reinforcement bracket MUST go inside the skeleton body cavity. If you put it on the outside, you won't get the structural "sandwich" effect.
- ❌ Forcing misaligned holes: If the arm-side holes don't line up perfectly, don't force it. Adjust the angle slightly. Remember: 4-5 engaged screws out of 8 is sufficient for full strength.
- ❌ Using an impact driver: Power tools make it too easy to overtighten. Use a manual screwdriver for proper control and feel.
- ❌ Installing without test fitting: Always loosely position all parts first to verify alignment before final tightening. This prevents having to back out and restart.
- ❌ Drilling pilot holes too large: Use a small bit - the pilot holes just need to guide the screws, not accommodate them fully. Oversized holes won't hold properly.
REMEMBER: The reinforcement bracket must be installed from inside the skeleton body cavity. The two pilot holes you drill serve as anchors to hold it in place while you attach the female connector from the outside. This creates a strong "sandwich" connection. And most importantly: HAND-TIGHT IS TIGHT ENOUGH! Real Customer Feedback
"The item was as described, and installation was self explanatory! Getting screw holes to line up for installing the arm side of the joint was tricky, and I do think we stripped or cracked some of the screw holes there during installation. But I think 4 or 5 out of 8 screws engaged will be good enough. The threaded inserts on screw holes that really mattered was a very nice touch, and the fasteners provided were of high quality. Best solution for shoulder joint upgrades I have found!"
When to Upgrade 🔧 Repair Mode
Stock shoulder cracked, broken, or worn out from previous seasons.
🛡️ Prevention Mode
Proactively upgrade before failure occurs (the smart move!).
🚀 Want Maximum Strength?
Check out our Black ASA (stealth look) and Carbon Fiber ASA-CF (2x stronger) versions!
Search for "The Mellos Designs skeleton" to see all upgrade options.
Technical Specifications
- Material: White ASA
- Weather Resistance: Excellent
- UV Stability: High
- Compatibility: Home Depot 12ft Skeleton (all years)
- Coverage: ONE shoulder per kit
- Hardware: Stainless steel included
- Inserts: Threaded brass
- Manufacturing: Precision 3D printed
- Color: White (OEM match)
- Origin: Made in USA (Alabama)
IMPORTANT: Each kit upgrades ONE shoulder. Most customers order 2 kits to upgrade both shoulders for balanced strength and appearance. Why Choose The Mellos Designs?
As a Controls & Industrial Data Engineer with 25+ years in automation and manufacturing, I design parts that solve real problems with real engineering. These aren't hobby prints - they're precision-manufactured components using industrial-grade materials and professional equipment.
Your 12ft skeleton deserves better than flimsy stock parts.
Upgrade once. Upgrade right.
SHIPS FAST - Printed on-demand in Alabama, USA
Questions? Message us anytime - we're here to help!
© The Mellos Designs - Professional 3D Printed Solutions


 ABOUT
ABOUT